
在机器人调试过程中,日志系统和参数文件非常重要。这里提供一个简单魔板,实现日志写入、参数加载。包含:
1、一个可以通过程序把符号、数字等日志信息写入程序的模板。仅依赖C++11(或更高版本)。每次运行新建一个日志文件,拥有规律命名格式。可以自动删除一段时间之前所产生的文件。
2、一个可以通过程序读取、加载、修改不同类型的参数的模板,包括整型、浮点型、字符型、矩阵类型的参数。依赖于opencv。
日志相关
命名规则
命名规则通过 "log_ + 日期" 的格式 所以首先需要获取时间:
// 获取以s为单位的时间点,所对应的字符串std::string get_current_time_str(){// 获取当前时间std::chrono::system_clock::time_point now = std::chrono::system_clock::now();// 将当前时间转换为 std::time_t 类型std::time_t now_time = std::chrono::system_clock::to_time_t(now);// 将 std::time_t 类型转换为可读的字符串char buffer[100];strftime(buffer, sizeof(buffer), "%Y-%m-%d-%H-%M-%S", std::localtime(&now_time));return std::string(buffer);}// 获取以ms为单位的时间点,所对应的字符串std::string get_current_time_str_ms(){// 获取当前时间std::chrono::system_clock::time_point now = std::chrono::system_clock::now();// 将当前时间转换为 std::time_t 类型std::time_t now_time = std::chrono::system_clock::to_time_t(now);// 获取毫秒部分std::chrono::milliseconds ms = std::chrono::duration_cast<std::chrono::milliseconds>(now.time_since_epoch()) % 1000;// 将 std::time_t 类型转换为可读的字符串char buffer[100];strftime(buffer, sizeof(buffer), "%Y-%m-%d-%H-%M-%S", std::localtime(&now_time));std::stringstream ss;ss << buffer << "." << std::setw(3) << std::setfill('0') << ms.count();return ss.str();}
提取时间(用做日期比较)
在删除以前的文件时,我们需要从文件的命名规则里提取出时间,所以这里写一个函数用于将"%Y-%m-%d-%H-%M-%S"格式的字符串转为时间格式。
// 该函数的作用,是将"%Y-%m-%d-%H-%M-%S"格式的字符串转为时间格式std::tm parse_filename_date(const std::string& filename) {std::tm tm = {};std::istringstream ss(filename);ss >> std::get_time(&tm, "%Y-%m-%d-%H-%M-%S");return tm;}
遍历并删除文件(根据日期比较)
在删除以前的文件时,我们需要遍历文件夹内所有的文件名,并根据文件名后缀的日期比较,判断是否删除文件。这段代码里,通过std::chrono接口获取时间点,通过1entry = readdir(dir)) != NULL遍历文件夹,通过parse_filename_date获取文件后缀所对应的日期,通过std::remove删除文件。需要提前创建文件夹,否则会进入if (dir == NULL)判断。输入参数date_ago可以被设置为std::chrono::hours(24 * 10);表示10天, n小时:std::chrono::hours( n )、n分钟:std::chrono::minutes( n )、类似还有seconds,microseconds,nanoseconds
void Traverse_delete_files(const std::string& filedir, std::chrono::system_clock::duration date_ago) {std::chrono::system_clock::time_point now = std::chrono::system_clock::now();std::chrono::system_clock::time_point some_days_ago = now - date_ago;struct dirent* entry;DIR* dir = opendir(filedir.c_str());if (dir == NULL) {std::cerr << "Error opening directory: " << filedir << "\n";exit(0);}// 遍历filedir文件夹while ((entry = readdir(dir)) != NULL) {// 得到每个文件名std::string fname = entry->d_name;// 剔除对 "."、".."、文件名字符数少于5的文件 的操作if (fname == "." || fname == ".." || fname.size()<5) continue;// 剔除对 文件名前四个字符不是"log_"的文件std::string first_five_chars = fname.substr(0, 4);// .substr(0, 4)表示从第1个字符开始取4个字符if(first_five_chars != "log_") continue;std::cout << "find log file name: " << fname << std::endl;// 取出 log_2023-06-06-21-03-00 的日期部分std::string date_str = fname.substr(4);// .substr(4)表示取从第5个字符开始的所以字符// 将日期部分的字符,转为时间格式std::tm file_date = parse_filename_date(date_str);std::chrono::system_clock::time_point file_timepoint = std::chrono::system_clock::from_time_t(std::mktime(&file_date));// 如果这个时间在some_days_ago之前,则删除这个文件if (file_timepoint < some_days_ago) {// 注意fname只是文件名,还需要加上路径std::string rmpath = filedir + fname;std::cout << "remove file: " << rmpath << std::endl;// 删除文件std::remove(rmpath.c_str());}}}
新建当前日志
把新建当前程序的日志文件的操作,放到对一段时间以前的日志文件删除操作之后。这里将log_ofs、mlog_mutex设置为函数外的变量,是希望可以在其它在程序外或者其它线程,进行日志写操作 首先进行了一个覆盖写操作,若文件存在则全部覆盖掉(清除),若文件不存在会新建一个。然后log_ofs被设置为追加写操作。需要提前创建文件夹,否则不会创建日志文件,会进入if (!log_ofs1.is_open())判断。
std::ofstream log_ofs;std::mutex mlog_mutex;void set_newlog(const std::string& filedir) {std::string current_time_str = get_current_time_str();std::string filename = filedir + "log_" + current_time_str;// 创建一个用于写入的 ofstream 对象,若文件不存在,会新建文件,std::ios::out表示覆盖写std::ofstream log_ofs1(filename, java 日志基础知识 std::ios::out);// log_file1 << "System started" << std::endl;log_ofs1.close();// 重新打开文件,std::ios::app表示追加写log_ofs.open(filename, std::ios::app);std::cout << "Set log to: " << filename << std::endl;}
日志内容写入
将日志信息写入log文件。通过流操作,可以像cout一样方便地写入,这里提供一个写入模板:
// 一个写入模板,mlogFile_mutex与log_file可以被当做全局变量,在不同的地方对文件进行写入// mlogFile_mutex保护文件在多线程使用的时候不被同时写入float testnum = 128.128;std::unique_lock<std::mutex> lock(mlog_mutex);log_ofs << "testnum: " << testnum << " time: "<< get_current_time_str_ms() << std::endl;lock.unlock();
总体代码
根据以上的设计,总结代码如下:
// 日志文件写入、删除// g++ logtest.cpp -o test -std=c++11class MyLog{public:MyLog(const std::string& filedir, std::chrono::system_clock::duration date_ago){mfiledir = filedir;// n小时:std::chrono::hours( n ),n分钟:std::chrono::minutes( n ),类似还有seconds,microseconds,nanosecondsmdate_ago = date_ago;};~MyLog(){std::unique_lock<std::mutex> lock(mlog_mutex);mlog_ofs << "system end, log_ofs closed " << get_current_time_str_ms() << std::endl;lock.unlock();mlog_ofs.close();};// 获取以s为单位的时间点,所对应的字符串std::string get_current_time_str(){// 获取当前时间std::chrono::system_clock::time_point now = std::chrono::system_clock::now();// 将当前时间转换为 std::time_t 类型std::time_t now_time = std::chrono::system_clock::to_time_t(now);// 将 std::time_t 类型转换为可读的字符串char buffer[100];strftime(buffer, sizeof(buffer), "%Y-%m-%d-%H-%M-%S", std::localtime(&now_time));return std::string(buffer);}// 获取以ms为单位的时间点,所对应的字符串std::string get_current_time_str_ms(){// 获取当前时间std::chrono::system_clock::time_point now = std::chrono::system_clock::now();// 将当前时间转换为 std::time_t 类型std::time_t now_time = std::chrono::system_clock::to_time_t(now);// 获取毫秒部分std::chrono::milliseconds ms = std::chrono::duration_cast<std::chrono::milliseconds>(now.time_since_epoch()) % 1000;// 将 std::time_t 类型转换为可读的字符串char buffer[100];strftime(buffer, sizeof(buffer), "%Y-%m-%d-%H-%M-%S", std::localtime(&now_time));std::stringstream ss;ss << buffer << "." << std::setw(3) << std::setfill('0') << ms.count();return ss.str();}// 该函数的作用,是将"%Y-%m-%d-%H-%M-%S"格式的字符串转为时间格式std::tm parse_filename_date(const std::string& filename) {std::tm tm = {};std::istringstream ss(filename);ss >> std::get_time(&tm, "%Y-%m-%d-%H-%M-%S");return tm;}// 该函数的作用,遍历文件夹,并删除一段时间之前的日志文件void Traverse_delete_files(const std::string& filedir, std::chrono::system_clock::duration date_ago) {std::chrono::system_clock::time_point now = std::chrono::system_clock::now();std::chrono::system_clock::time_point some_days_ago = now - date_ago;struct dirent* entry;DIR* dir = opendir(filedir.c_str());if (dir == NULL) {std::cerr << "Error opening directory: " << filedir << "\n";exit(0);}// 遍历filedir文件夹while ((entry = readdir(dir)) != NULL) {// 得到每个文件名std::string fname = entry->d_name;// 剔除对 "."、".."、文件名字符数少于5的文件 的操作if (fname == "." || fname == ".." || fname.size()<5) continue;// 剔除对 文件名前四个字符不是"log_"的文件std::string first_five_chars = fname.substr(0, 4);// .substr(0, 4)表示从第1个字符开始取4个字符if(first_five_chars != "log_") continue;std::cout << "find log file name: " << fname << std::endl;// 取出 log_2023-06-06-21-03-00 的日期部分std::string date_str = fname.substr(4);// .substr(4)表示取从第5个字符开始的所以字符// 将日期部分的字符,转为时间格式std::tm file_date = parse_filename_date(date_str);std::chrono::system_clock::time_point file_timepoint = std::chrono::system_clock::from_time_t(std::mktime(&file_date));// 如果这个时间在some_days_ago之前,则删除这个文件if (file_timepoint < some_days_ago) {// 注意fname只是文件名,还需要加上路径std::string rmpath = filedir + fname;std::cout << "remove file: " << rmpath << std::endl;// 删除文件std::remove(rmpath.c_str());}}}void Traverse_delete_files() {Traverse_delete_files(mfiledir, mdate_ago);}// 该函数的作用,新建当前程序日志文件void set_newlog(const std::string& filedir) {std::string current_time_str = get_current_time_str();std::string filename = filedir + "log_" + current_time_str;// 创建一个用于写入的 ofstream 对象,若文件不存在,会新建文件,std::ios::out表示覆盖写std::ofstream log_ofs1(filename, std::ios::out);if (!log_ofs1.is_open()) {std::cerr << "log_ofs1: Failed to open the file." << std::endl;exit(0);}log_ofs1 << "System started" << std::endl;log_ofs1.close();// 重新打开文件,std::ios::app表示追加写mlog_ofs.open(filename, std::ios::app);std::cout << "Set log to: " << filename << std::endl;}void set_newlog() {set_newlog(mfiledir);}std::ofstream mlog_ofs;std::mutex mlog_mutex;private:std::string mfiledir;std::chrono::system_clock::duration mdate_ago;};int main(){std::string path_log = "/home/john/Desktop/ctest/log/";MyLog mylog(path_log, std::chrono::hours(24 * 10));mylog.Traverse_delete_files();mylog.set_newlog();float testnum = 128.128;std::unique_lock<std::mutex> lock(mylog.mlog_mutex);mylog.mlog_ofs << "testnum: " << testnum << " time: " << mylog.get_current_time_str_ms() << std::endl;lock.unlock();return 0;}
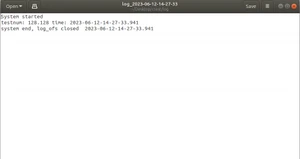
运行结果为:

参数读取相关
参数读取,这里是读取yaml文件格式的参数,这里使用opencv的接口实现。也可以使用yaml-cpp工具库实现,但opencv的接口实现有一个好处是,可以读写矩阵格式。
参数文件创建与FileStorage初始化
先参数文件创建,我们可以直接新建一个yaml文件就好了。或者或者我们可以使用写操作,在没有这个参数文件的时候,程序会新建一个参数文件,前提是它的文件夹存在,记得fs.release();。注意opencv里,参数文件的前两行需要有:
%YAML:1.0---
FileStorage初始化的操作如下:
string configPath = "/home/john/Desktop/ctest/test.yaml";/* 初始化 */FileStorage fs;// FileStorage fs(configPath, FileStorage::READ);/ 覆盖写操作 /fs.open(configPath, FileStorage::WRITE);// 覆盖写,此步会清空 yaml 文件if(!fs.isOpened()){cerr << "fs.isOpened() return false at FileStorage::WRITE! FAIL" << endl;return 1;}/* 追加写操作 /fs.open(configPath, FileStorage::APPEND);// 追加写,此步是在 yaml 文件末尾追加,不会清空文件if(!fs.isOpened()){cerr << "fs.isOpened() return false at FileStorage::APPEND! FAIL" << endl;return 1;}/* 读取操作 /fs.open(configPath, FileStorage::READ);if(!fs.isOpened()){cerr << "fs.isOpened() return false at FileStorage::READ! FAIL" << endl;return 1;}..................fs.release();
参数读写格式
FileStorage使用上与流操作类似。FileStorage支持int、float、bool等普通变量类型的读写,还支持vector、map、matrix格式的读写。
对于普通变量的读写
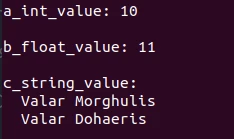
// 写fs << "a_int_value" << 10;fs << "b_float_value" << 11.0;fs << "c_string_value" << " Valar Morghulis \r\n Valar Dohaeris";..................// 读int a;float b;string c;fs["a_int_value"] >> a;fs["b_float_value"] >> b;fs["c_string_value"] >> c;cout << "\na_int_value: " << a << endl;cout << "\nb_float_value: " << b << endl;cout << "\nc_string_value: \n" << c << endl;
写入内容在yaml文件里显示为

读出内容在终端显示为
vector的读写
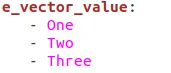
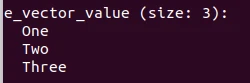
// 写fs << "e_vector_value" <<"[" << "One" << "Two" << "Three" << "]";..................// 读vector<string> e;FileNode n = fs["e_vector_value"];// 从序列中读取vectorif (n.type() != FileNode::SEQ){cerr << "e_vector_value is not a sequence! FAIL" << endl;return 1;}n >> e;cout << "\ne_vector_value (size: " << e.size() << "): " << endl;for (vector<string>::iterator it = e.begin(); it != e.end(); ++it){cout << " " << *it << endl;}
写入内容在yaml文件里显示为
读出内容在终端显示为
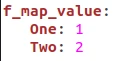
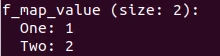
map的读写
// 写fs << "f_map_value" << "{" << "One" << 1 << "Two" << 2 << "}";..................// 读FileNode n = fs["e_vector_value"];// 从序列中读取vectorif (n.type() != FileNode::SEQ){cerr << "e_vector_value is not a sequence! FAIL" << endl;return 1;}n >> e;cout << "\nf_map_value (size: " << f.size() << "): " << endl;for(std::map<string, int>::iterator it = f.begin();it != f.end();it++){std::cout << " " << it->first << ": " << it->second << endl;}
写入内容在yaml文件里显示为
读出内容在终端显示为
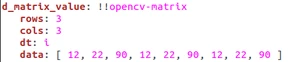
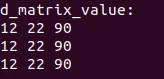
matrix的读写
一般我们矩阵操作使用eigen,opencv的矩阵格式是mat,opencv提供了cv2eigen()函数,把mat类型转为eigen类型。若报错:fatal error: unsupported/Eigen/CXX11/Tensor: No such file or directory 在cmake里添加:add_definitions(-DOPENCV_DISABLE_EIGEN_TENSOR_SUPPORT)
// 写fs << "d_matrix_value" << (cv::Mat_<int>(3, 3) << 12, 22, 90,12, 22, 90,12, 22, 90);Eigen::Matrix3i matrix_d;cv2eigen(d, matrix_d);..................// 读fs["d_matrix_value"] >> d;cout << "\nd_matrix_value: \n" << matrix_d << endl;}
写入内容在yaml文件里显示为
读出内容在终端显示为
一个示例模板
程序:
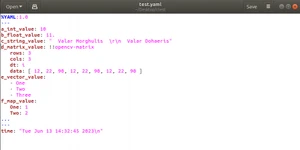
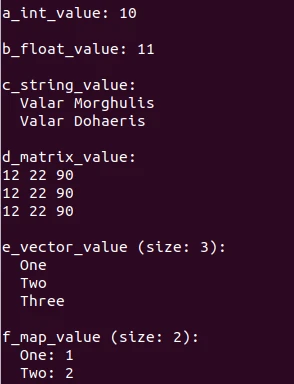
using namespace std;using namespace cv;int main(int argc, char argv) {string configPath = "/home/john/Desktop/ctest/test.yaml";/* 初始化 */FileStorage fs;// FileStorage fs(configPath, FileStorage::READ);/ 覆盖写操作 /fs.open(configPath, FileStorage::WRITE);// 覆盖写,此步会清空 yaml 文件if(!fs.isOpened()){cerr << "fs.isOpened() return false at FileStorage::WRITE! FAIL" << endl;return 1;}fs << "a_int_value" << 10;fs << "b_float_value" << 11.0;fs << "c_string_value" << " Valar Morghulis \r\n Valar Dohaeris";fs << "d_matrix_value" << (cv::Mat_<int>(3, 3) << 12, 22, 90,12, 22, 90,12, 22, 90);fs << "e_vector_value" <<"[" << "One" << "Two" << "Three" << "]";fs << "f_map_value" << "{" << "One" << 1 << "Two" << 2 << "}";fs.release();/* 读取操作 /fs.open(configPath, FileStorage::READ);if(!fs.isOpened()){cerr << "fs.isOpened() return false at FileStorage::READ! FAIL" << endl;return 1;}int a;float b;string c;cv::Mat d;vector<string> e;map<string, int> f;// 读取普通类型fs["a_int_value"] >> a;fs["b_float_value"] >> b;fs["c_string_value"] >> c;fs["d_matrix_value"] >> d;Eigen::Matrix3i matrix_d;cv2eigen(d, matrix_d);{FileNode n = fs["e_vector_value"];// 从序列中读取vectorif (n.type() != FileNode::SEQ){cerr << "e_vector_value is not a sequence! FAIL" << endl;return 1;}n >> e;}{FileNode n = fs["f_map_value"];// 从序列中读取mapif (n.type() != FileNode::MAP){cerr << "f_map_value is not a MAP! FAIL" << endl;return 1;}n["Two"] >> f["Two"];// f["Two"] = (int)(n["Two"]);n["One"] >> f["One"];// f["One"] = (int)(n["One"]);}cout << "\na_int_value: " << a << endl;cout << "\nb_float_value: " << b << endl;cout << "\nc_string_value: \n" << c << endl;cout << "\nd_matrix_value: \n" << matrix_d << endl;cout << "\ne_vector_value (size: " << e.size() << "): " << endl;for (vector<string>::iterator it = e.begin(); it != e.end(); ++it){cout << " " << *it << endl;}cout << "\nf_map_value (size: " << f.size() << "): " << endl;for(std::map<string, int>::iterator it = f.begin();it != f.end();it++){std::cout << " " << it->first << ": " << it->second << endl;}fs.release();/* 追加写操作 /fs.open(configPath, FileStorage::APPEND);// 追加写,此步是在 yaml 文件末尾追加,不会清空文件if(!fs.isOpened()){cerr << "fs.isOpened() return false at FileStorage::APPEND! FAIL" << endl;return 1;}time_t rawtime; time(&rawtime);fs << "time" << asctime(localtime(&rawtime));fs.release();return 0;}
cmake文件:
cmake_minimum_required(VERSION 2.8)project(test)set(CMAKE_BUILD_TYPE Release)set(CMAKE_CXX_FLAGS_RELEASE "-O3 -std=c++11")set(CMAKE_C_FLAGS_RELEASE "-O3 -std=c++11")add_definitions(-DOPENCV_DISABLE_EIGEN_TENSOR_SUPPORT)find_package(Eigen3 3.1.0 REQUIRED)find_package(OpenCV 4 REQUIRED)MESSAGE("OPENCV VERSION:")MESSAGE(${OpenCV_VERSION})set(LIBS${EIGEN3_LIBS}${OpenCV_LIBS})add_executable(testhttps://mp.weixin..com/logtest.cpp)target_link_libraries(test ${LIBS})
结果:


 点击“阅读原文”查看详情
版权声明:
本文来源网络,所有图片文章版权属于原作者,如有侵权,联系删除。
本文网址:https://www.bianchenghao6.com/h6javajc/25176.html